Showing posts with label Recipe. Show all posts

Sunday, May 29, 2011

My not so swirly raisin bread

I started out using the tangzhong method for making bread.  With my so-called success, I wanted to branch out a little bit.  I turned to the trusted  Baking: From my home to Yours by Dorie Greenspan.  I had success with most of her recipes and felt her bread recipes would not disappoint.  I decided on her Raisin Swirl Bread recipe as it allowed me to make the bread over the course of two nights.  I have to say it was very easy to make, easier than the tangzhong method.  My loaf didn’t turn as as swirly as I used a  different size loaf pan and didn’t roll out my dough to match it.  Nevertheless, I was happy it turned out almost like the picture in the book, just less swirly.  
Now, one cannot make raisin bread and not make French toast.  As a side to my French toast, I knew I wanted bacon as for once, there was some in my fridge.  In a discussion we had at work about bacon (yes, we’re always discussing food), my friend show me how I can make maple bacon.  I don’t know why I never thought of that before and it’s super easy to make!   I paired it with some fruit to make it a little healthier.
I been looking and waiting and was finally able to get my hands on some duck eggs.  Although I had brunch plans, I couldn’t resist making fried duck egg on raisin toast. It's definitely more tasty then regular chicken eggs.  I didn’t feel like sunny side up, so I made it overeasy…which didn’t make it look as appealing presentation-wise. It was good and the greek yogurt with fruit was a perfect side. I still managed to eat at brunch and even had lunch!

Raisin Swirl BreadMakes 1 loaf in 9x5” loaf pan

For the bread

1 packet active dry yeast

¼ cup sugar, plus a pinch

1 ¼ cup just-warm-to-the-touch whole milk

½ stick unsalted butter, at room temperature

¾ tsp salt

1 large egg

3 ¾ to 4 cups all-purpose flour

For the swirl

1 tbsp sugar

2 tsp ground cinnamon

1 cup moist, plump raisins (dark or golden)

3 tbsp unsalted butter, softened to a spreadable consistency

1. Put the yeast in a small bowl, toss in the pinch of sugar and stir in ¼ cup of the warm milk. Let rest for 3 minutes, then stir – the yeast may not have dissolved completely and may not have bubbled, but it should be soft

2. Working with a stand mixer, preferably fitted with a paddle attachment, combine remaining 1 cup of milk, the butter and the remaining ¼ cup sugar and mix on low speed for a minute or two. Add the salt, and egg and mix for a minute. The mixture will look unpleasantly curdly. Add the yeast mixture and beat on medium-low speed for 1 minute.

3. Turn off the mixer and add 2 ¾ cups of the flour. Mix on low speed just until you work the flour into the liquids – you’ll have a sticky mix. If you’ve got a dough hook, switch to it now. Add another 1 cup of flour, increase mixer speed to medium and beat the dough for a couple of minutes. If the dough does not come together and almost clean up the sides of the bowl, add up to ¼ cup more flour, 1 tbsp at a time. Keep the mixer speed at medium and knead the doubh for about 3 minutes, or until it is smooth and has a lovely buttery sheen. The dough will be very soft, much too soft to knead by hand.

4. Butter a large bowl, turn the dough into the bowl and cover bowl tightly with plastic wrap. Put the bowl in a warm place and let the dough rise until it is double in size, about 1 ½ hours.

5. Scrape dough onto a large piece of plastic wrap, wrap it and put it in the freezer for 30 minutes to firm enough to be rolled easily. At this point, you can instead refrigerate the dough overnight.

6. To make the swirl, whisk together the sugar, and cinnamon. Check that the raisins are nice and moist, if not, steam them for a minute, and then dry well.

7. Put the dough on a large work surface lightly dusted with flour and lightly dust the top of the dough and roll the dough into a rectangle about 12 x 18 inches.

8. Gently smear 2 tbsp of butter over the surface of the dough – this is most easily done with your fingers.

9. Sprinkle over the sugar mixture and scatter over the raisin. Starting from a short side of the dough, roll the dough up jelly-roll fashion, making sure to roll the dough snugly. Fit the dough into the buttered pan, seam side down, and tuck the ends under the loaf.

10. Cover pan loosely with wax paper and set in a warm place; let dough rise until it comes just a little above the edge of the pan, about 45 minutes.

11. Preheat the oven to 375 degrees. Line a baking sheet with parchment or silicone mat.

12. Melt the remaining 1 tbsp of butter, and brush the top of the loaf with the butter.

13. Put the pan on the baking sheet and bake the bread for about 20 minutes. Cover loosely with f a foil tent and bake for another 25 minutes or so.

14. Transfer the pan to a rack and cool for 5 minutes, then unmold. Inver the bread and cool to room temperature ride side up on the rack.

Wrapped in plastic, the loaf will keep at room temperature for about 3 days; wrapped airtight, it will keep in freezer for up to 2 months.


Saturday, April 30, 2011

Making use of my Cookbook Collection

I love buying cookbooks so when a favourite cookbook author has a new book, I almost always have to buy them. Don’t get me wrong, I don’t normally pre-order. I go through the process of whether I need it, will use it but in the end always reward myself with it. In the end, it normally just sits on the shelf with all my other books waiting to be used. However, I have now decided that if I don’t use more of the books I currently own, I won’t allow myself to buy more. I’ve owned a few of Dorie Greenspan’s baking books and jumped on the chance to buy her current cookbook – Around My French Table. I’m happy to say I’ve used one of her chicken recipes and it was delicious and easy to make.

After realizing I had four apples way past its prime but still edible, I remember seeing this Apple cake recipe in Dorie’s book. I took it out and love that it had very few ingredients. I think preparing the apples took the longest for me. I agree with Dorie that the appeal of this cake is that it’s simple but satisfying. So if you have four extra apples lying around, please make this cake. I’m sure you’ll love it!

Marie-Helene’s apple cake – makes one 8inch cake
Adapted from Dorie Greenspan’s Around my French Table

Ingredients
¾ cup all purpose flour
¾ tsp baking powder
Pinch of salt
4 large apples (if you can, choose 4 different kinds)
2 large eggs
¾ cup sugar
3 tbsp dark rum (I omitted this as I didn’t have any)
½ tsp pure vanilla extra (also omitted as I don’t like using it)
8 tbsp (1 stick) unsalted butter, melted and cooled

Center a rack in the oven and preheat oven to 350F. Butter the springform cake pan and place on baking sheet.
1. Whisk flour, baking powder and salt together
2. Peel , core and cut apples into 1 to 2” chunks
3. In a medium bowl, beat eggs with whisk until foamy. Pour in sugar and whisk for a minute or so to blend. Whisk in rum and vanilla extract. Whisk in half of flour mixture, when incorporated, add half of melted butter, followed by rest of the flour and the remaining butter. Mix gently after each addition so you have a smooth, rather thick batter.
4. Switch to a rubber spatula and fold in apples. Turn fruit so it’s coasted with batter and scrape evenly into prepared pan.
5. Bake cake for 50-60 minutes or until top of the cake is golden brown and a knife inserted in comes out. Cake also pulls away from sides of the pan. Transfer to a cooling rack and rest for 5 minutes. Serve warm or at room temperature. This cake keeps at room temperate for about 2 days.

Enjoy!

Saturday, February 19, 2011

Spaghetti alla Bolognese


For 4 servings:

1lb of extra lean ground beef

½ medium onion diced

5 cloves of garlic (can be reduced to 2 cloves – I like it garlicky)

1 cup of red wine

1 can of tomatoes

1 tbsp of tomato paste

2 dried bay leaves

Seasoning of salt and pepper

1. Heat oil still simmering, add onions and garlic and cook till onions soft and translucent. Stir frequently to avoid garlic from burning.

2. Add ground beef and stir to break down to small pieces

3. When ground beef browned, add the wine and simmer until evaporates.

4. Add the can of tomatoes and tomato paste, bay leaf and simmer for about one hour or until sauce is thick.

Saturday, January 15, 2011

Happy New Year!

My first post of 2011 is a little late but it’s been so crazy at work; I’ve had no time to do much of anything.  My New Year’s resolution this year was to not be so lazy.  I definitely haven’t been lazy; I even went into work on New Year’s Day!  Yet, the work seems to be never-ending.    I think work has slowly taking over my life.  I need to work harder to balance it out again.  Even though I worked some crazy hours this week, I somehow managed to make bake twice, and all in one night!  I made banana loaf for Tomy and bittersweet brownies for myself.  I’ve experimented with various brownie recipes and still think this one is the best…8ozs of 70% bittersweet chocolate.  How can you beat that?  The recipe comes from Alice Medrich’s Pure Dessert. 
Bittersweet Brownies Adapted from Alice Medrich's Pure Dessert

Ingredients (makes sixteen 2” brownies):
8oz 70% bittersweet chocolate, coarsely chopped – I used Lindt
3oz unsalted butter, cut into several pieces
3 large eggs
150g sugar
Scant ¼ tsp salt
1.2oz all purpose flour
Directions:
Preheat oven to 350F and line 8” square baking pan with parchment
1. Place chocolate and butter in heatproof bowl and set over a pan of almost simmering water. Stir frequently until mixture is melted, smooth and quite warm. Remove and set aside.
2. In medium bowl, beat eggs, sugar and salt until eggs are thick and light coloured.
3. Whisk in warm chocolate and fold in flour.
4. Scrape batter into lined pan and spread evenly. Bake until a toothpick inserted into center comes out clean, about 25-30 minutes. Cool on a rack.


Enjoy!

Tuesday, November 18, 2008

Red bean ice cream


The freezer container of my new ice cream maker has been sitting untouched in my freezer the last three months. Last weekend, I finally got around to using it to make red bean ice cream. The recipe is from Pichet Ong’s The Sweet Spot. The ice cream turned out well , my only complaint would be the red bean was too hard even though I cooked it an hour longer than he recommended. If I ever make it again, I’ll definitely soak the red bean overnight prior to cooking it. As well, I might make only ½ the recipe since I only had one scoop out of the whole quart. I made poor Tomy eat the rest of it.

Red Bean Ice Cream
Adapted from Pichet Ong’s The Sweet Spot

Red Bean
½ cup (3½ ounces/107g) dried adzuki beans, picked over and rinsed
1 tsp fresh lemon juice
2 tbsp sugar
1/8 tsp salt

Custard
3 large egg yolks
1 cup (8 ounces/227g) whole milk
¾ cup (5 ounces/141g) sugar
¼ tsp salt
1 cup (8 ounces/227g) heavy whipping cream
2 tsp vanilla extract

1. To cook the red bean: Put the red beans, lemon juice, sugar, and salt into a small saucepan and cover with 1¾ cups water. Bring to a boil over high heat and boil vigorously for 3 minutes. Turn the heat to low and simmer, uncovered, stirring occasionally, until the beans are tender, about 2 hours. If the mixture starts to look dry at any point, add ½ cup water. Set aside to cool completely.

2. To make the custard: Whisk the egg yolks in a medium mixing bowl until broker; set aside. Put the milk, sugar, salt, and ½ cup of the cream in a medium saucepan and warm over medium heat, stirring occasionally, until bubbles begin to form around the edges. Remove from the heat and pour ½ cup of the warm milk mixture onto the egg yolks in a slow, steady stream, whisking constantly. Transfer the yolk mixture back to the saucepan, set over low heat, and cook, stirring constantly, until the mixture is thick enough to coat the back of a wooden spoon and registers 165F, about 5 minutes. Remove from the heat and stir in the vanilla and cooled red beans.

3. Transfer the mixture to a large mixing bowl and stir in the remaining cream. Set over a larger bowl of ice and water and stir occasionally until cool to the touch, about 40F. Alternatively, cover and refrigerate until cold.

4. Transfer the mixture to your ice cream maker and freeze following the manufacturer’s instructions. Enjoy immediately, or freezer for a firmer ice cream. The ice cream is best enjoyed fresh, but it will keep in an airtight container in the freezer for up to 3 days.

Tuesday, November 4, 2008

Simple Recipes

I stumbled across Dessert Magazine and found this recipe to try since I have close to a whole carton of buttermilk in the fridge. It’s Emily Luchetti's recipe for Chocolate Pound Cake – I’ve seen her books but do not own any of them. I was excited to try making it since it’s such a simple recipe to make. My first bite, the only word I could think of to describe it is “soft”. I took time to slowly eat devour it today and yes, it’s soft but it’s also fudgy. Not like the normal pound cake texture I've tried - perhaps I've only eaten plain ones in the past.

Another simple recipe I whipped up last night was Rose Reisman's low fat carrot cake. I love that it’s a two-pot recipe that you can hand whisk and get in the oven within 30 minutes. For me it’s getting the ingredients that takes time, whisking it all together is a matter of minutes. Instead of baking it in my bundt pan, I decided to make carrot muffins. Sometimes I think I need to make something that is a tad healthier. This uses only 1/3 cup of oil so it’s better than a cake with loads of butter.

Saturday, October 25, 2008

Weekend baking

I haven’t have been baking as much as I would like as I’ve been learning to cook. I had thought I would have more time to bake during the week but after making dinner I’m pretty much beat. So baking is left for the weekend.
Last weekend I did try out a few recipes. I’ve been craving apple tart from this store by work but thought since I had apples in the fridge, why not make my own. I found a quick puff pastry recipe on line, whipped up some pastry cream then assembled the tarts. Somehow it didn’t turn out as I planned. I didn’t have any apricot glaze or jam of any type so there was no glaze. I don’t think I had enough pastry cream either...I guess it’s back to the drawing board. Maybe I won’t be lazy next time and put in the effort and make puff pastry. The quick puff pastry just doesn't taste the same.

Boy do I love making pastry cream...and I love eating it. Instead of using my tried and true recipe, I tried the recipe from Dorie Greenspan’s Baking: From My Home to Yours. The difference is this one uses egg yolks. My recipe uses whole eggs and whipping cream so it’s richer.

Pastry Cream – Makes about 2 cups
Adapted from Dorie Greenspan’s Baking: From My Home to Yours

2 cups whole milk
6 large egg yolks
1/2 cup sugar
1/3 cup cornstarch, sifted
1½ tsp pure vanilla extract
3½ tbsp

1. Bring milk to boil in saucepan. Meanwhile, in medium heavy-bottomed saucepan, whisk the yolks together with the sugar and cornstarch until thick and well blended. Still whisking, drizzle in about ¼ cup of the hot milk – this will temper, or warm, the egg yolks so they won’t curdle. Whisking all the while, slowly pour in the remainder of the milk. Put the pan over medium heat and, whisking vigorously, constantly and making sure to get to edges of pot, bring mixture to a boil. Keep at a boil, still whisking, for 1 to 2 minutes, then remove from the heat.
2. Whisk in the vanilla extract. Let sit for 5 minutes, then whisk in butter a little at a time, stirring until fully incorporated and the pastry cream is smooth and silky. Scrape pastry cream into a bowl. Press a piece of plastic wrap on top of cream to create airtight seal. You can store in fridge or to cool it quickly put in bowl of ice.

Of course I didn’t only make apple tarts.

My cousin came over and we made gluten free banana loaves, we misread the recipe and put in a tad too much salt, so it was salty banana bread. I think the recipe also needs more banana to give it more moisture...it was a bit dry the next day.

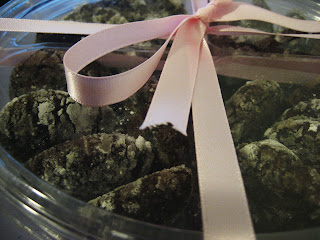
To cap off the weekend, I whipped up a batch of chocolate crackle cookies to send off to a friend in HK via her husband who was in town. I hope she and her daughter enjoys it. Of course this was all last weekend and being Saturday again – I have to decide what to make this weekend. I do need to get to the grocery store though as I’m all out of sugar!